Sunday, 10 July 2011

Final Task

My final brief was based on a client needs just like in the real life. I get a chance to work for the real artist who is willing to give young people a chance to develop their skills and produce the product which is on the professional level. When I met Andy Mallen he told me about his music and the album he recorded and would like to promote on the music market. I got a chance to listen two of his singles; Stoney Broke and I am not A. He described his music as a mixture of different styles appealing to wide range of audience. His music was about social and political issues like increasing the student fees or decreases the pensions. However it is not only about the money it is also about feeling and citizen’s statuses.

So when I already had enough information I was ready to do some audience research. I did it through the questionnaire which results than I used to create the digipack for the artist which will be than sold successfully.

After gathering the information about the audiences I start to plan the ideas for the character. As my client wanted to have the character which people could connect to when listening to his music. The album name is Video Boy therefore the genre of the character is male. I did the spider diagram to have the better clarity in my thoughts. I chose to do the first design with the pieces of paper to create the collage to express the character through various male features connected together. This idea could represent the different aspects of life and many issues at once. When I finished my first idea I found that it is not as effective looking as I would like it to be. The character was too abstract without its own style, so it didn’t represented the Andy’s music well enough.

Then I chosen another option this time I didn’t chosen the manual work, art but I decided to relay on the computer design. However to do the editing on the computer to make my work copyright free, firstly I drawn my characters on a piece of paper and then I scanned it to the computer. Due to the technology I was able to make the outlines of the drawing thicker to create the computer look. However with outlines on the plain background it looked too empty and because I really liked this idea I decided to develop it a bit more. I thought to use Photoshop software in order to put the colours into the areas in character’s body, but it had to many disadvantages; the design might look not professional and too simple not meeting my client’s needs.  So the next idea came to my head, I was inspired by my previous design and decided to add the textures to my characters. I did it with a help of Photoshop, I downloaded copyright free images with textures, then I selected the right areas in character body with magic wind and I paste the images inside the areas at the end I adjusted the pictures to the areas. The outcomes were amazing I was really happy with results, I liked my idea a lot but I still wanted to complete another idea to have a variety to choose from. So again I had an opportunity to practice the manual, art skills and two of the older printing techniques. The practice was based around the idea of Video Boy. First technique was extremely simple, it is called Mono Print. For Mono Print I needed to have an acrylic paints, piece of paper, pencil or something to write with and rolling equipment. The way I did my mono print; I simple putted the small amount of paint on the table I used the rolling equipment to get the paint spread evenly, next I placed the paper on top of the paint I start to draw my design. When I it was ready I took my paper and I left it to dry. The effect I got was the white outlines with a nice surfaced background. To develop my idea I repeated this process once again this time the creation I did was much better.


 Afterward I get a chance to dry another technique commonly used in 18th centaury to produce Bibles and other important books like this. The technique is called dry point and it is made by gravure the design on top of the plastic plate with a help of sharp equipment. This type of print is time consuming and with comparison to Mono print it is made with ink not with paint. When my design was ready I get the ball looking tool with a little handle and I soaked it with ink. Then by doing round movements with my waist I placed the ink in the gravure spaces and in the plate. Next I putted the plate into the machine and then the paper on the top of it. By turning the wheel the machine started to work, squeezing the plate and paper together by big roll and leaving the print on the paper. The results were in my opinion better than when using Mono Print. Even though it is taking more time it had a nice old looking, faded effect at the end.
After finishing with my experimenting and my third idea, I ask my peers which of the ideas will match and will satisfy my client’s requirements for sure. The majority answered that the second design is really good and should be used in my final design. When people asked, what I should develop in my design they found that one of my character haven’t got the eyes and they suggested to add the eyes in as it will even more be connected with the audience and the society around. Once I have agreed on my final character I was ready to create the digipack. Beforehand I researched the legal requirements to be prepared for every problem I might have and avoid them.


I decided to have the black background as this colour is representing the music well and it is very universal and unisexual. Next I tried different positions of my character; I chosen the simple lay out with the title and character being at the central point of CD cover.  I thought this solution would be the best as it will have a character at the very front so that people will refer to the album through the character as it is really easy to remember. After completing my CD cover i asked people from different age group about their opinions. They all liked my idea but they didn’t like the font of the title. They thought it is too futuristic, so I changed it to have written style with nice texture and the feedback were very positive people thought this design was better than previous one.

One I had my perfect CD cover I started to design the inside; lyrics page and cd holder, however I faced a huge problem and I could get my design from my usb stick and I lost all the data stored there. I even went to the IT store but they couldn’t help me. However the lyrics page was made with the same font like a front title, but in the holes of letters I placed the yellow colour to get the design a little bit lighter and looking more lively. I also added few yellow pictures representing the Video Boy which were; a cassette, CD, computer screen, headphones and pc itself. I added the eroded effect to the pictures to represent the music even better and to create this feeling of suspension. In addition the damaged effect it is representing the male part of society well as boys are tend to get into some fights or be not very tidy and clean. Back cover was just a black background with the logos of the producers and recording companies at the right corner. Also with the title going across the page from the angle as well as the small name of the artist appearing next to the logos as he don’t want to be recognized  by the name but by the character.
Overall I am really proud of my development work I think the whole process teach me how to deal with the clients and how to produce the real life products. Although I have a  better understanding of the nature of printing and product design  I also learned about the language which need to be used to persuade and colours and things which will attract the given audience. In my opinion I completed the task successfully without any major issues.

Friday, 18 March 2011

Digipack Research

MIKA CD


Mika is an very positive artist, therefore his design for album is funky and cartoony style as even the title of his CD is ‘Life in Cartoon’. The main focus on the front cover is the artist’s name created in a 3D technique, the actual photograph of a singer is blended into the cartoony drawings; it is really small, but placed next to his name so people will straight away recognize him from the imaginary world. The theme beyond all of the cartoons are the clouds and the sky. The style of music the artist is producing is easy to identify as there is a character laying on a sofa, audience will connect it with a relax and calm. Also the piano at the top, left corner is suggesting that the music will contain a lot of piano playing. The font used at the back is similar to the hand written effect, which makes CD more personal, according to the artist. Technique used throughout the design of the CD could be compared to the famous collage technique without using the ripping paper effect; replaced by computerized editing. Overall the CD have a positive effect on the audience as it is colourful, it reminds people of happiness and joy. I think artist achieved the wanted outcome and I personally like it as well.

FAERIE ARCHIVES DIGIPACK


The digipack of Faerie Archives is different from normal designs. Its design is printed on the old paper. To keep it really thematic there is the motif of old map of a house and letters and well as old pictures placed inside to keep audience more engaged and connected with the CD; it is like a sharing the secrets. Even the name of the band is bringing to mind that Archives is something old from the past.
The CD itself have a title kept with the same design as a inside of digipack, however the graphics and background colours are not the same. The blue and green theme is creating sense of sky. The character is representing the faerie with white wings and white clothing suggesting her purity. The faerie’s gesture might suggest the type of music included on the CD, gracious and delicate. On the other hand the old theme and maps might suggest the mystery and  secrets therefore the music can reflect those subjects. Overall  the digipack is really personal it reveals some secretes you are able to assume it by the notes placed inside and the map showing house and secret places.

RIOT DIGIPACK


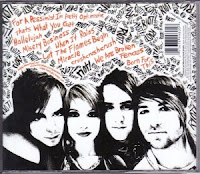
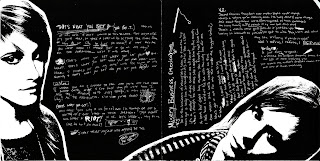
Riot is a band playing light rock music. The colour scheme of their digipack is black, white and orange, those three contrasting colours and matching together well and representing the style of the band. The orange colour is used to highlight important information included into the digipack. The front cover is showing the picture of the four members of the band. It is also repeating the roughly hand written logo to make people remember and connect with the artist straight away after seeing the cover. Also the white frame is containing the information about this album, however the name of it is not written with capital letter; this might be insignificant because Riot band is not caring about the formality of the writing; they know that they fans will listen to them no matter what. The background throughout the digipack is written with felt tip pen. The repetition of the bands name come across in every section and by looking at it you are getting the felling of graffiti type of style, although it is not.


The inside page 1 is illustrating two members of the band on the black background. Their pictures are edited so that they are black and white to match to overall theme of the album. On page 1 there are private messages incorporated with photos, those messages are hand written, scratched on top of black background.  Page 2 is all about the credits and thanks to persons who helped with realisation of the Riot band album and digipack. Though they are mixed together creating the mix mash of words. On the back cover there is a close up picture on a members of band smiling, looking straight onto you. This is giving away the sense of being grateful and friendly toward everyone who listen to their music.  At the back cover there is also the list of songs included in album, however they are not numbered, but again mixed with various words you can only spot them because of different colour (orange; used to highlight).

Practice CD Cover Design


This CD cover idea came from my drawing of interpretation of Nerina Pallot song called Shopia. My orginal drawing had some different features, but I decided to change them as they didn't look nice while I was designing. So what has changed? Firstly in my drawing insted of artist head I drew the heart, however it wasn't looking proffesional enough. 
Therefore I decided to add a little bit surrealism to my design and insted of heart I placed artist head creating the character of a flower with human head. Also At my drawing I had houses and cars at the background, but I though it will be too much if I would add them to my design. What I like the most in my design is the paper cut effect of the 'flower body'. It makes the CD cover more interesting. If I would have chance to improve I would consider to change the font of the artist name as I think I could match better with the graphics.

Friday, 4 March 2011

Evaluation of My Final Magazine Cover

After turning my week points into as I believe my strong sections, I asked people one more time about their estimation of my magazine cover. The opinions were a lot better than last time, the bad comments also appeared but very rarely, however they concerned little things like a position of a barcode.

What people liked about my beauty cover now? They liked the match of main image and layout as well as the fonts used; they described it to be reflective in a sense of a genre of the magazine, eye catching due to various vibrant colours, friendly and interesting looking, nice, professionally made magazine cover. So I was really happy to hear those positive views of people. This time my magazine improved a lot. It is aiming at its target audience, looking fabulous and effective. I think the changing of the background from white to the whole image was a big step forward to what I achieved at the end. Now I suppose my magazine is looking better and if I would have a chance to improve it I would change the logo of the brand and I would also add a sky line at the top to make it look even more funky and professional. Overall I am satisfied with my work, I putted a lot of effort into it and I believe the effects are visible...

My Final Cover Design

Evaluation of My Pratice Magazine Cover

Review of my first magazine cover design wasn’t impressive; however people made some good and bad comments about it. Therefore to get the most of their opinions I tried to consider every point their made regarding my design.  Half of the peoples liked my white background and the main image of the model I chosen; they thought I was looking professional. The other half preferred to have whole image on the cover as they consider it appearing to be livelier. Vast majority liked my logo design and name, they review it to be successful in sending the message, not like the whole overlook of the magazine cover ,which they believed wasn’t  showing enough of my selected topic; beauty. What often people didn’t like was the layout and colour scheme. As I used three colour schemes; white, candy pink and light blue, the colours didn’t stand out very well, they did made the cover aiming for girls however it wasn’t bold and attractive enough. Whereas the layout of text was a bit confusing for eyes and the font styles didn’t match each other. In general my scores were good; however few pieces and areas needed necessary to improve.